This guide will take you through the basics of how to create a Remote Learning Resource Web Page to contain information and uploaded documents from your Schoolzine Control Centre.
Click here to view an example of a Remote Learning Page
For more information on this process, please read the following article.
What Can Remote Learning Resource Pages Be Used For?
A Remote Learning Web Page can be created to contain inforation and uploaded files from your Schoolzine Control Centre. Uses for this page are, but not limited to:
- Remote Learning Resources
- Homework for Students to access from home
- Assessment Files for Students to access from home
- Annual Reports
To create your Remote Learning Resource Web Page you will need to do the follow steps:
- Create your Media Files Tags which will allow you to upload your files to the Resource page.
- Create and setup your Remote Learning Page with your Media Files Tags.
- Upload your files to your Media Library and apply the required tag.
Create a New Media Files Tag
You are able to create your own custom tags to link files to your Remote Learning Resources Page. The Tag will be used to make your Media Files display on the page you have added it to.
Examples of different types of tags could be any of following:
- Year Levels
- Types of Assessment
- Subjects (Maths, English, Science)
To create your Media Files Tag, follow the below instructions:
- Log into your Control Centre
- Select the Settings Tab
- Open the Manage Tags option
- Select the Add Tag button in the Top Left
- Populate the Name Field
- Select Media Files from the Tag Availability box
This will allow your tag to be used with any uploaded Media Files from the Media Library
For more information on Managing Tags, please refer to our Knowledge Base.
Creating A New Web Page
A Web Page will be required for your files to accessible by your readers. Web Pages can then be linked to your Website, SZapp, or simply sent to your readers as a link they can bookmark on their computer.
The below process will assist you in setting up the Remote Learning Web Page.
- Log in to your Control Centre and select the Content menu tab.
- Once expanded, select Web Pages.
- Select the New Page button.
- Fill in your Page Title and Page Heading.
- Leave the Status as Active and the Menu Display as Visible to display the Web Page.
- Leave the Page Type as New Page.
- The URL field will create a URL (web address) based off of the Page Title.
Menu Settings – Tags
The Tag field is used to control where the Web Page is going to display. You can apply any off the tags below if you wish.
- Newsletter Menus (side-menu, top-menu)
- SZ Website Menu (website-top-menu)
- SZApp Tiles (app)
You will then need to create a new Content Holder to setup the content of your page.
This is where you can add your Media Files Tags.
To add in your Media Files Tags and setup your page content, follow the below instructions:
1. Scroll to the Page Content section
2. Select the New Content Holder button
Please note: You can link a previously created Content Holder by using the drop-down box on the left
3. Input your Content Holder Title
4. Add in any headings and content you wish to display on the page.
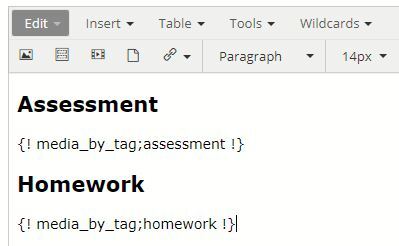
5. Add the Tag Code: { !media_by_tag:XXXXX! }
Please Note: You will need to replace the XXXXXX with the Tag Value of your Media Files Tag which can be found when you go to the Tag in your account. See the below example screenshot for further information
For further information on Creating a New Web Page, please refer to our Knowledge Base.
Uploading Files To The Media Library
- Log into your Control Centre
- Select the Content Tab
- Open the Media Library option
- Upload your Media File
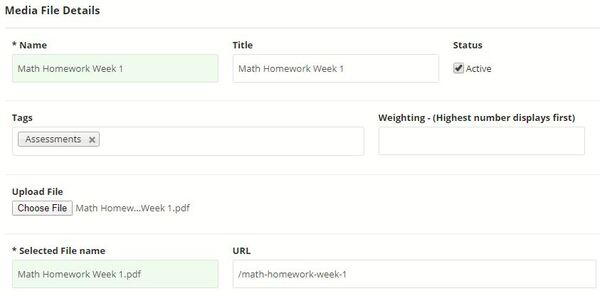
You can use the Add New File button, or the Quick Add Drag and Drop option to add your files - Apply your Media Files Tag to your File
Please note: If you used the Quick Add Drag and Drop option, you will need to edit the Media file, or use the Bulk Actions feature to add your Media Files Tag