
Surveys are a great way to measure reader interest on certain subjects and a fun way to make your newsletters more interactive. Once setup, Surveys can be linked to the side and top menu of your newsletter, placed directly into your newsletter content, added to your website, and even sent out via a Newsflash or the SZapp.
- Log in to your Control Centre and select the Content menu tab.
- Once expanded, select Surveys.
- Select the + New Survey button.
Details
- Fill in your Survey Name and Survey Page Heading.
- Fill in the Description field with any instructions or other information.
Note: You are also able to populate other media items, hyperlinks, and pictures within this section. - Click Save & Continue.
Builder
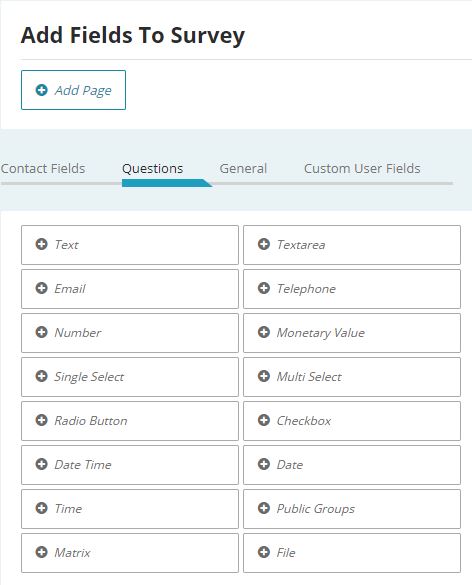
- From the Builder page, you can start to build your Survey. Click the fields on the right to add them.
If you require any Custom Fields such as Dietary Requirements or Allergies, you will need to create these from the Questions section. - It is recommended you include a First Name, Last Name, and Email Field within most Surveys as this will provide you with enough contact details in the event you need to follow up the reply.
- Once added, your fields can be rearranged by using the click and drag arrow button.
- If your Survey has a large amount of content, you can create multiple pages by clicking the Add Page button to separate fields into sections.
- Click Save & Continue.
Contact Fields
Lists standard contact details that can be included in a web form. We recommended you include a First Name, Last Name, and Email Field within most web forms as this will provide you with enough contact details in the event you need to follow up the reply.
Note: A contact email field is required when using any field from the Contact Fields tab. If you do not have the Contact Fields tab displaying, you will need to select this from the Details tab in step 1.
Input Fields
Allows you to add custom fields to your web form.
Text – Insert a basic text field
Textarea – Insert a field with multiple lines of text
Email – Insert an email address
Telephone – Insert a telephone number
Number – Insert a number
Monetary Value – Insert a number
Single Select – Select a single option from a dropdown list of answers
Multi Select – Select multiple options from a dropdown list of answers
Radio Button – Select a single option from a list of answers
Checkbox – Select multiple options from a list of answers
Date Time – Select the date and time using a calendar and clock dropdown
Date – Select a date from a calendar dropdown
Time – Select the time from a clock dropdown
Matrix – Answer multiple questions using the same responses
File – Upload a file with the web form
General
Allows you to add headings, text and custom fields to your web form.
Heading – Add a heading to your web form
Message – Insert text into the web form. Note: This cannot be formatted
Recaptcha – Inserts a verification module into the web form. Note: These are used to help prevent spam responses

Content – Insert formatted text into the web form. Can also include media such as images, videos and links
Picture – Insert an image into the web form
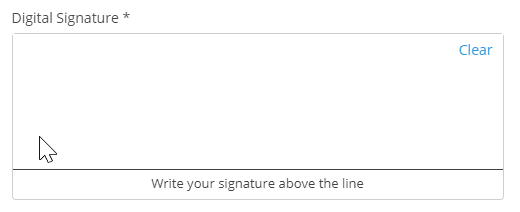
Digital Signature – Allows responders to digitally sign the web form
Custom User Fields
Allows you to add custom user fields to your web form, if they have previously been set up in your account.
Settings
- From the Settings page, you can choose to specify a maximum completion limit for your Survey, which controls whether your contacts will be able to complete the Survey more than once.
Note: You may leave these fields blank if they are not relevant. - If applicable, set the Commencement and Expiration date and time.
- You do not need to update the Workflow Email Settings fields as they are auto populated with a subject line for the email, as well as your default email address. If you require others to receive a notification each time the form is submitted, then simply separate each additional email with a comma.
Note: If you do not wish to receive notification emails, you can untick the send workflow emails box. You can view the results of your Survey at any time by selecting the view details button from the list of Surveys, and selecting Survey Records. - Click Save & Continue.
Confirmations
You have the option of displaying a custom thank you message by typing it in the editor, or redirecting the contact to a webpage of your choice when they click the submit button.
Autoresponder
Once a Survey has been completed, you can elect to have their submission details emailed back to them. Set your preferences here. If you do not wish for an autoresponder email to be sent, you can untick the send contact a notification email box.
Preview
When you are happy with your Survey, click Finish.
Making Your Survey Public
Now that your Survey has been created, you’ll need to make it public. There are a few different ways you can do this.
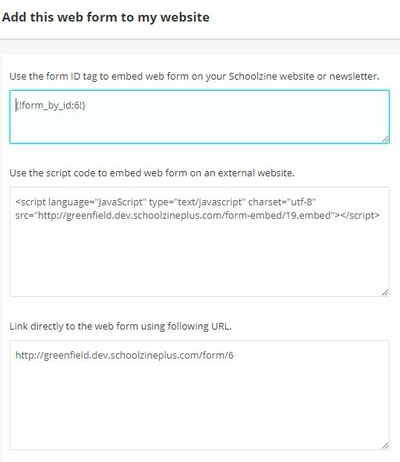
First, select the Embed Survey button to see what your options are.
If you’d like the Survey to be embedded on your website, you can use the code in the first box. If you’d like the Survey to be embedded in your newsletter, you can use the text in the second box. Finally, you can include the link to your Survey in a Newsflash, on your website, within the content of your newsletter, as an app tile, or in the Side Panel of your newsletter.
If you’d like assistance with sharing your Survey with the community, contact the Support Team.