The eNews Builder newsletter allows you to effortlessly create articles for your newsletter and share these with your community.
To begin building your newsletter, follow the below steps:
- Log in to your Control Centre and select the eNewsletters.
- Click the Newsletter Name that you want to edit.
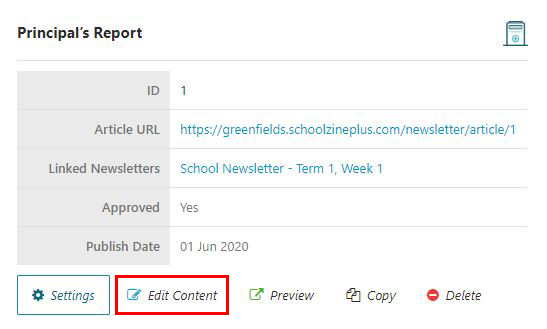
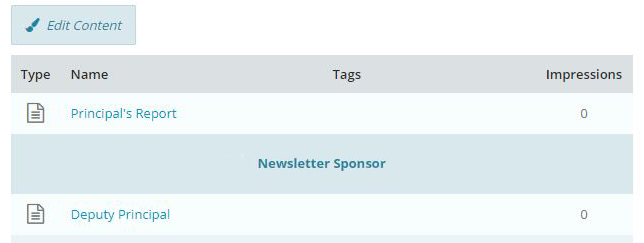
- Select the Edit Content button to open up the eNews Builder editor.
- Select the + Icon to expand the ribbon, and select the desired Article Type or link existing eNews Builder Articles or Events.
Important: ‘Legacy’ articles created from within the Control Centre will not be available from your library, and you will only be able to select ‘eNews Builder’ Articles constructed via the front end. - Add and Style your content.
Important
eNews Builder Newsletters are designed to be created in multiple smaller content elements instead of being created all in one large article.
Schoolzine recommends creating your newsletter one content element at a time, instead of creating the entire article/newsletter content in one block.
Editing Article Settings
You can edit the Settings of your Article’s at any stage by selecting the Cog Icon located in the top right-hand corner of your Article Element and adjust your settings as needed.
You can also use the Bin Icon to remove the content from your newsletter.
Please note: If your Article is only linked to a single newsletter, and it is deleted with the Bin Icon then your newsletter is saved, it will delete the content from your account entirely. You will need to recreate the content to re-add it to the newsletter. If your article is linked to multiple newsletters, the Bin Icon will only unlink it from the currently edited newsletter.
Reordering your Articles
You can use the Arrow Icons to move your Articles either up, or down within your Newsletter. Please note that if you move the Article, it will also move all Content Elements contained within this Article with it.
Editing Articles from the Control Centre
You can locate and edit an Article from the Schoolzine Control Centre rather than editing from the Newsletter. To edit an Article in this way, follow the below steps:
- Navigate to the Content Menu Tab
- Select Articles
- Locate your Article and click the Article Name
- Select Edit Content
Types of Articles
Text Article
This Article Type populates with a Heading and Text Content.
To create your Article content, simply select the placeholder text to delete and add your own content.
Editing your Text Article
When using the Edit Cog for your Text Article, it will give you access to the following options:
- Featured Image: This option allows you to upload or select a previously uploading image as a Featured Image on your Article
- Summary: This option will allow you to add a Summary for your Article
- Approved: This slider option will allow you to toggle the Article in the approved status
- Indexing: This slider option will toggle the visibility of this Articles Header from the newsletter’s Table of Contents
- Print Only: This slider option will make this Article only show in the printed view of your newsletter
- No Print: This slider option will make this Article only show in the online view of your newsletter
- Tags: This drop down option allows you to select any number of tags that may be relevant to your Article
Image Left
This Article Type populates with a Heading, Text Content and an Image floated to the left of the text.
To add your image:
- Click the default Image holder.
- Select the Upload button (or select one from your Media Library using the Browse button).
- Select Choose file and select the image from your system.
- Select Upload.
- Select your Image Style.
If you need a border on your image select Border otherwise select No Border.
To create your article content, simply select the placeholder text to delete and add your own content.
Editing your Image Left Article
When using the Edit Cog for your Image Left Article, it will give you access to the following options:
- Featured Image: This option allows you to upload or select a previously uploading image as a Featured Image on your Article
- Summary: This option will allow you to add a Summary for your Article
- Approved: This slider option will allow you to toggle the Article in the approved status
- Indexing: This slider option will toggle the visibility of this Articles Header from the newsletter’s Table of Contents
- Print Only: This slider option will make this Article only show in the printed view of your newsletter
- No Print: This slider option will make this Article only show in the online view of your newsletter
- Tags: This drop down option allows you to select any number of tags that may be relevant to your Article
Image Right
This Article Type allows you to have a Heading, Text Content and an Image floated to the right of the text.
To add your image:
- Click the default Image holder.
- Select the Upload button (or select one from your Media Library using the Browse button).
- Select Choose file and select the image from your system.
- Select Upload.
- Select your Image Style.
If you need a border on your image select Border otherwise select No Border.
To create your article content, simply select the placeholder text to delete and add your own content.
Editing your Image Right Article
When using the Edit Cog for your Image Right Article, it will give you access to the following options:
- Featured Image: This option allows you to upload or select a previously uploading image as a Featured Image on your Article
- Summary: This option will allow you to add a Summary for your Article
- Approved: This slider option will allow you to toggle the Article in the approved status
- Indexing: This slider option will toggle the visibility of this Articles Header from the newsletter’s Table of Contents
- Print Only: This slider option will make this Article only show in the printed view of your newsletter
- No Print: This slider option will make this Article only show in the online view of your newsletter
- Tags: This drop down option allows you to select any number of tags that may be relevant to your Article
Full Media
This Article Type will add a Heading, Text Content and two media options. An option for adding Two Images and a Video Embed option.
Editing your Full Media Article
When using the Edit Cog for your Full Media Article, it will give you access to the following options:
- Featured Image: This option allows you to upload or select a previously uploading image as a Featured Image on your Article
- Summary: This option will allow you to add a Summary for your Article
- Approved: This slider option will allow you to toggle the Article in the approved status
- Indexing: This slider option will toggle the visibility of this Articles Header from the newsletter’s Table of Contents
- Print Only: This slider option will make this Article only show in the printed view of your newsletter
- No Print: This slider option will make this Article only show in the online view of your newsletter
- Tags: This drop-down option allows you to select any number of tags that may be relevant to your Article
Link Article
This Article Type allows you to select a previously created eNews Builder article.
- Select the Link Article Article Type.
- Find the Article you want to link and press the INSERT button on the Right-Hand Side.
Note: You can search for your Article Title using the Search Box in the Top Left-Hand Corner.
IMPORTANT!
If you make any changes to Articles which are linked to multiple newsletters, it will adjust the content in ALL linked newsletters.
If you wish to create a copy of the content of a prior newsletter, you can select the COPY button when you are searching for an Article. This will create a separate duplicate which you can edit and change for the new instance.
Please note: you are unable to link any pre-existing ‘Legacy’ Articles created under the Legacy DIY Newsletter Platform. Any Articles you wish to include in your content will need to be recreated in the eNews Builder interface.
Link Event
This Article Type allows you to select a previously created Event.
- Select the Link Event content type.
- Search for the Event you want to link and press the INSERT button on the Right-Hand Side.
Note: You can search keywords for your Event Name using the Search Box in the Top Left-Hand Corner.
Editing your Linked Event
When using the Edit Cog for your Linked Event, it will give you access to the following options:
- Featured Image: This option allows you to upload or select a previously uploading image as a Featured Image on your Article
- PDF Flyer: This option allows you to upload or select a previously uploaded PDF file to be used as a flyer for your event
- Flyer Text: This option allows you to edit the display text for your attached PDF flyer
- Start/End Date: This option allows you to edit the start/end date of your event
- Start/End Time: This option allows you to edit the start/end time for your event
- All Day: This option allows you to set the event as an All Day event
Please note: If this is enabled, you will no longer be able to set a Start/End Time of your event - Approved: This slider option will allow you to toggle the article in the approved status
- Indexing: This slider option will toggle the visibility of this Articles Header from the newsletter’s Table of Contents
- Print Only: This slider option will make this Article only show in the printed view of your newsletter
- No Print: This slider option will make this Article only show in the online view of your newsletter


